Description
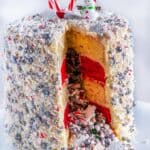
The ultimate festive holiday cake with a sprinkle explosion surprise inside! Made with a vanilla cake layer base and iced with Christmas peppermint buttercream frosting.
Ingredients
For the Vanilla Cake
- 3 3/4 cup flour
- 1 teaspoon baking soda
- 1 teasopon baking powder
- 1 teaspoon sea salt
- 3 large eggs, room temperature
- 2 egg whites, room temperature
- 2 cups granulated sugar
- 2 teaspoons vanilla extract
- 1 teaspoon vanilla paste (can be substituted with vanilla extract)
- 1 1/2 cups unsalted butter, room temperature
- 1 1/2 cups buttermilk
- 1 /3 cup milk
- 1 1/2 to 2 fluid ounces red food coloring (this is enough food coloring for about 3 layers)
For the Peppermint Buttercream Frosting
- 1 1/2 cups unsalted butter
- 8 ounces cream cheese
- 1 teaspoon peppermint extract
- 1 teaspoon vanilla paste (if unavailable, you can substitute vanilla extract)
- 3 cups powdered sugar
- 2 tablespoons heavy cream
For Decorating and the "Explosion" Cake Center (see notes for types and amount guidelines)*
- Assortment of Christmas themed sprinkles (sprinkles, nonpareils, meteors, sixlets, fun shapes like small stars, candy canes, and snowflakes)
- Crushed candy canes
- Red and white m&ms
- Candy cane chunks
- Any themed sprinkles and (small) candy you like!
Instructions
- Preheat oven to 350˚F. Grease 6 6″ straight edge cake pans. Line with parchment paper and grease again. Set aside.
- In a medium bowl, sift together flour, baking soda, baking powder, and salt together. Whisk until completely mixed.
- In a standing mixer or with a hand held mixer and a large bowl, cream butter, and sugar until light and fluffy, about 5 minutes.
- Whisk in eggs, egg whites, vanilla extract, and vanilla paste on a high speed until combined, about 2 minutes, scraping down sides as needed.
- On a low speed, whisk the flour mixture to the egg mixture until just combined.
- Still on a low speed, pour in the buttermilk and regular milk. Mix until just combined.
- Separate batter evenly into two bowls. Color the batter in one of the bowls with the red food coloring. Start with half of a 1 fluid ounce bottle and add more as desired for more red color.
- Pour batter evenly into greased layer pans. Bake 3 at a time for 10-15 minutes, until a toothpick comes out clean when inserted into the center of each cake. Set on a wire rack to cool, at least one hour, or frosting will melt.*
Make the Frosting
- In a standing mixer or with a handheld mixer, whisk butter and cream cheese until light and creamy. Sift in the powdered sugar. Add peppermint extract, vanilla paste, and heavy cream. Whisk until completely smooth.
Assemble the Cake
- Mix about 2 cups of sprinkles/candy mixture for the center of the cake and 2 cups of smaller, simpler sprinkles for the outside of the cake in two different bowls. Set aside.
- When the cake layers are cooled, place the cake layers with the flat side down. Use a 2-inch round cookie cutter to cut out the center of each layer except for the one you will be using for the top of your cake.
- Place a little bit of the frosting in the shape of your first cake "ring" layer on your cake stand, board, etc. to make sure the cake won't move while assembling. Lay the first cale layer on top of this frosting ring.With an offset spatula, spread the top of the layer with about 1/2 cup of frosting. Repeat for the next four layers. *Make sure to leave a little space between the frosting and the hole or your sprinkles will stick to the frosting and won't "explode" when sliced. Also make sure the layers line up!*
- Pour the sprinkles reserved for the center of cake down the hole.
- Add on the final layer (the one without the 2 inch hole), flat side up to make the cake even. Lightly frost the rest of the cake with half of the remaining frosting to create a crumb coat. Place cake in fridge and chill for 10 minutes.
- Remove cake from the fridge and frost with remaining frosting. Cupping your hands, scoop up some of the sprinkles reserved for outside of the cake. Tilting your hands, slowly move them up the sides and across the top of of the cake so the sprinkles spill out and stick to the frosting (I found it enormously helpful to have a piece of parchment paper underneath my cake stand, it help to stop the sprinkles that didn't stick from bouncing away too much). Garnish the top of the cake with any other decorations as desired.
- Place in the refrigerator to chill for 30 minutes to an hour, until frosting is set. Gently cut into the cake and remove a slice for a Christmas sprinkle explosion!
- Cover the cake tightly and store in the fridge for 4-5 days.
Notes
You will need around 1 1/2 to 2 cups of sprinkle filling for center, depending on how large your sprinkles are and how many m&ms and other larger candy pieces you use.
You will also need 1 to 2 cups of the smaller sprinkle assortment and crushed candy canes to decorate the outside and top of the cake. The amount needed for the outside decoration truly depends on size, if any bounce off, etc.
If you don't have 6 inch cake pans this recipe will also make one 8 inch, 3 layer cake.
You can make the cake layers the night before! Let them cool on a wire rack, cover with some plastic wrap (still in the cake pans), and place in the fridge to chill until your ready to assemble the cake the next day.
- Prep Time: 1 hour
- Cook Time: 30 minutes